
Creating Useful Exhibits at Depositions
Defense Law Articles
View more from News & Articles or Primerus Weekly

By: Holly Polglase - Hermes, Netburn, O'Connor & Spearing, P.C.
In product liability cases, depositions often involve witnesses describing body positions, distances, measurements, angles, locations of marks or where they were standing at the time of the accident and other situations which are not easily described in words. A product liability defendant has the arduous task of determining exactly what happened in the accident even though it was not there at the time. Often we need to rely on the testimony of the plaintiff or percipient witnesses who are not trained in describing physical events. Biomechanical and accident reconstruction experts need precise information in order to do their work and if they have it, they can often determine that the accident could not have happened in the manner claimed or that the alleged defect was not the cause of the injury. Practitioners have a number of tools at their disposal to create useful exhibits during depositions that pinpoint exact details in a manner that is hard for the witness to change or refute later at trial. Making use of those tools and paying attention to the details of what an exhibit shows while it is being made will allow the questioner to create exhibits that not only give the experts the details they need to support their opinions but are also powerful story tellers at trial.
BRING THE RIGHT TOOL FOR THE JOB
Preparation for the deposition begins with the notice and subpoena. If the deposition is of a non-party, request any relevant objects, papers (including statements, media reports collected, etc.), photos or videos which a witness of this type might have and require them to be brought to the deposition. Even if you have no information that the witness has given a statement or taken a photo, ask for these types of items in advance. A percipient witness may have taken a photograph or video of the accident scene that no one knows about. If they bring it on their phone, have them e-mail it to you, print out the best version you can and mark it right at the deposition. Make a complete copy of anything brought by the witness and mark it. If the witness brings an object that cannot be retained by you, photograph and document the object thoroughly, print out the photos and have the witness authenticate what is in the photos. If necessary, following the deposition, request an order preserving evidence so that the witness cannot discard the object if it will be needed for trial. If you can retain the object, mark it and have the witness authenticate it.
A deposition tool kit is essential for the product liability practitioner. It should contain markers and pens of different colors and thickness, a ruler, a measuring tape, flashlight, blank paper on which to draw and any tools needed to interact with the product at issue. For instance, if your case involves a circular saw, make sure you have the tools necessary to remove the blade. If the product at issue is available, and size permits, make arrangements to have it available at the deposition. If it is not available or its condition makes it impractical to work with, have an exemplar product present. Multiple copies of photographs of the scene or product that can be marked up at the deposition should be prepared in advance. It is often helpful to have objects which were closely involved in the accident available also. For instance, if the accident involved a power tool, have an example of the material being worked on at the time, such as the correct size board or shingle.
Consider doing the deposition on video so that the plaintiff or witness can show how the product was being used, held or manipulated at the time of the accident. Doing so will save time and be much clearer than having the witness try to describe how it happened. To be successful, you will need to have the product (or an exemplar) and examples of any other items involved in the accident at the deposition and doing so requires advance preparation and thought. Consult appropriate interrogatory responses or other documents describing the accident to ensure that your set up is accurate in advance. Below is an example of a set up done for a table saw accident:
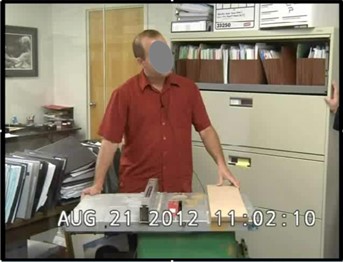
This set up required that the stand be set at the appropriate height and that the correct size and type of work material was available. Once you have the set up correct, ask the witness to put their hands or other relevant body parts in the position they were in at the time of the accident and ask them to show you what happened. Ask detailed and precise questions all along the way to ensure that the witness is demonstrating what you are asking him to demonstrate.
If you are not taking the deposition on video, a photograph can be just as useful for documenting the witness’s understanding of what happened. Below is an example of a witness describing how he found the victim of a fall immediately after the accident:
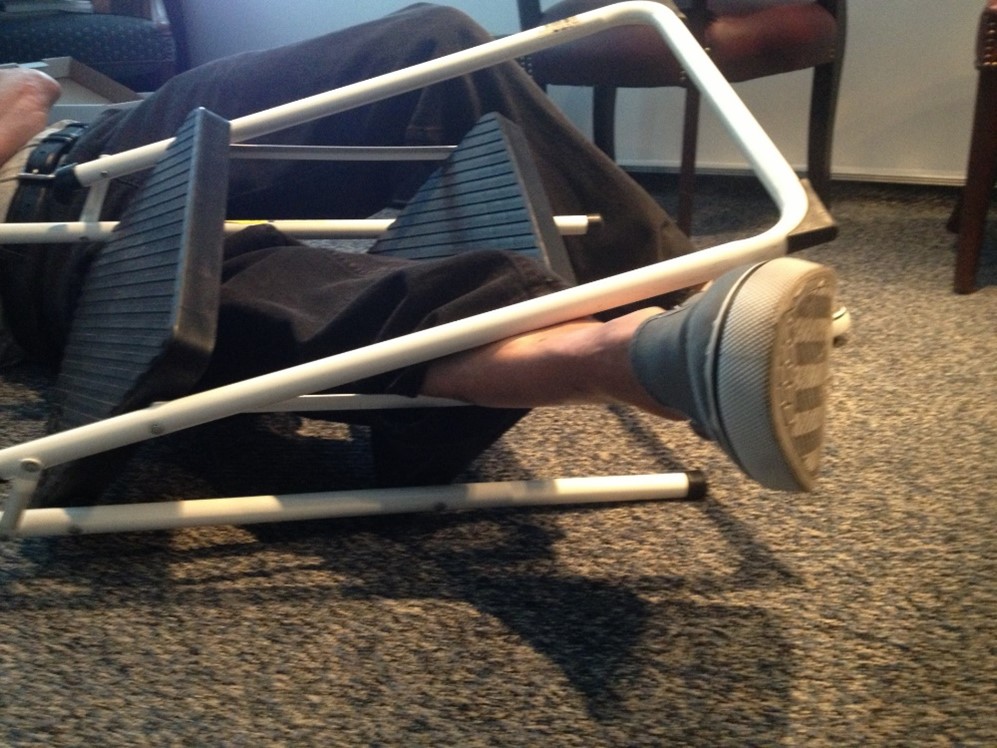
It would be next to impossible to get an accurate description of that position in words.
TAKE THE PEN
Practitioners are often reluctant to have a witness draw an object or mark up a photograph and therefore, forego making such exhibits during depositions to avoid giving up control to the witness. Witnesses sometimes think out loud while they are drawing, change their mind half-way through making a drawing and the exhibit or description ends up being a mess. Avoiding that type of debacle takes some advance planning and some initiative during the deposition. The most important lessen I have learned over the years is never give up the pen to the witness unless you are sure they can handle it and will do what you ask them to do. There is no rule that says you, the lawyer, cannot make the drawing or mark up the photograph. The important thing to remember is to have the witness adopt it as true and accurate with respect to what it is purporting to depict. Your questions in this regard should be detailed and precise. Below is an example of an X drawn where the plaintiff was standing at the time of the accident and an arrow depicting the location and direction he walked to get to that location:
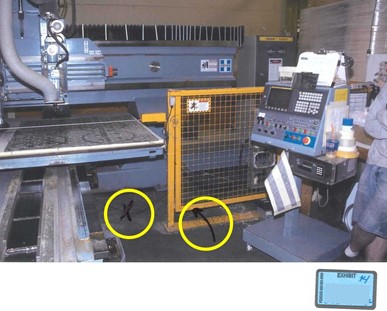
Because of the language barrier, it was a difficult deposition and it would have been impossible to get this exhibit put together without taking control of the pen. However, by taking the pen, asking the witness what direction he went and where he was standing, pointing to it and asking questions each step of the way, the witness authenticated the marks made on the photograph and the exhibit was irrefutable.
Often, verbal descriptions of physical objects can be confusing especially when there are different names for the same thing. Below is an example of using the pen to identify two different switches on a machine:
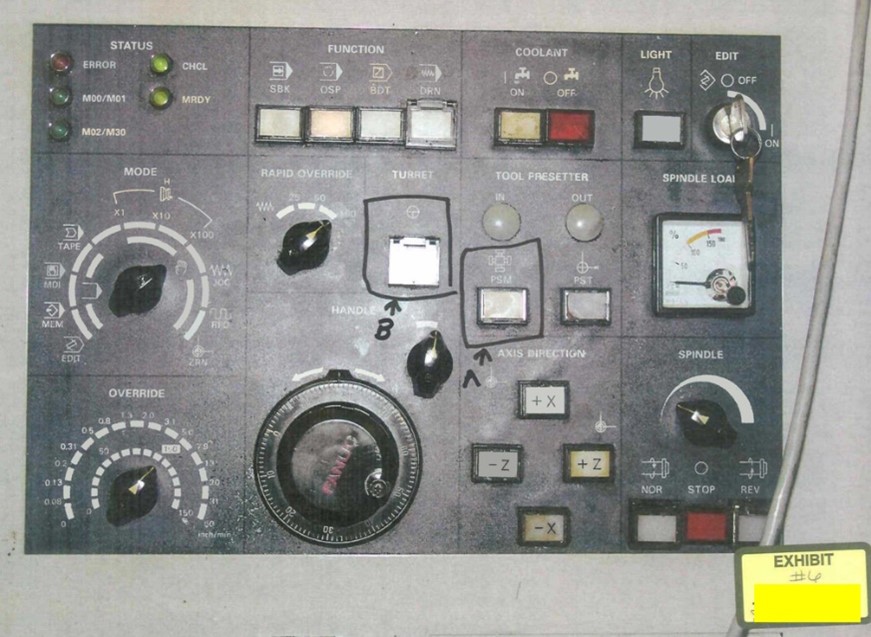
It was important to make sure that the witness and the lawyer knew which switch was being discussed so the questioner marked the photograph and asked the witness to identify by name switch “A” and switch “B”.
There is nothing more frustrating at trial than to have a deposition exhibit which is confusing and open to interpretation. By taking control of the pen, there is no limit to the manner in which a location, direction or object can be documented accurately. However, there are times when it is appropriate to let the witness draw it out for you. For instance, the layout of a room or a building is not something easily done by asking questions and drawing it out yourself. If the witness seems capable, let them do it but direct their work. Hand them the pen and paper and instruct them not to do anything until you ask them. Then, be very specific about what you want them to draw and ask them if they understand before they start. Below is an example of two exhibits drawn at the direction of counsel:
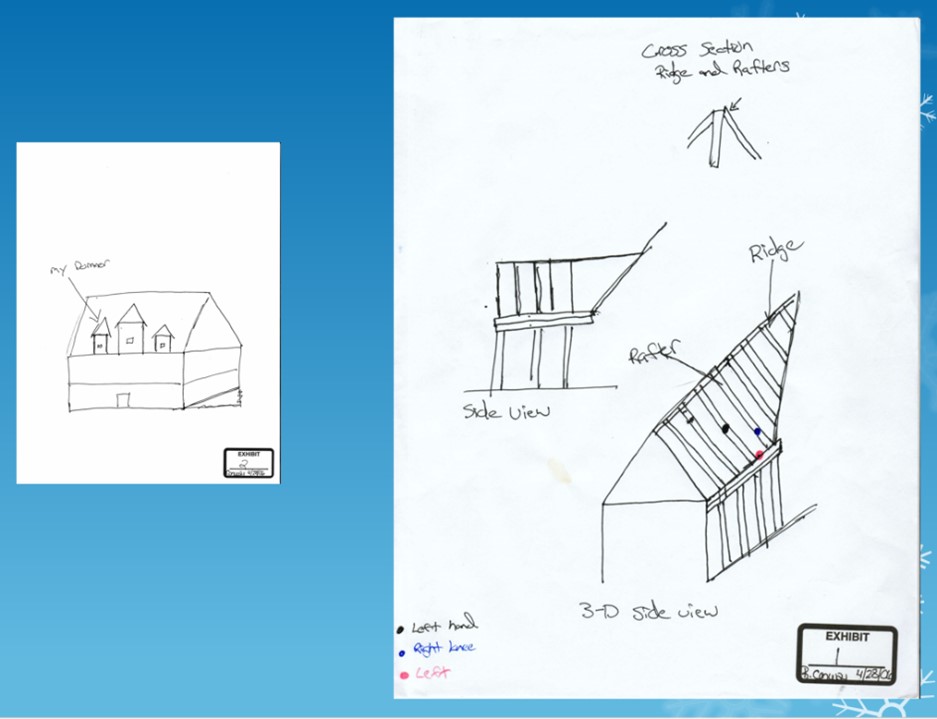
As a result of this drawing, we know not only exactly where the accident happened but where the witness’s body parts were located. With a little explanation in the transcript, we have a detailed exhibit that an expert can use in reconstructing the accident.
MEASURE IT, PHOTOGRAPH IT, MARK IT
Advance thought and preparation are important to documenting the matters your experts will need to do their work. Use a measuring tape to measure distances as well as the length of body parts such as arms, fingers and feet. When taking a measurement, ask the witness to acknowledge the measurement for the record. In addition, it is often important to know where on the body an injury occurred. Document scars which evidence the location at which the body interacted with the product. Below is an example of an exhibit depicting the witness’s foot and the location of a scar from the complained of injury:
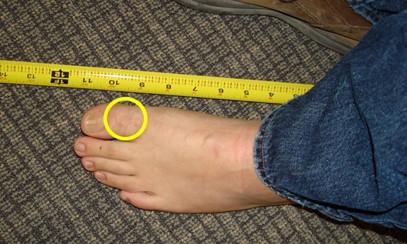
Once you have taken the photograph, print it out, mark it and have the witness state what the photograph shows.
CONCLUSION
The above depictions are just a few examples of what can be done with a little imagination and advance preparation. The examiner should not be shy or afraid the witness will say no when asked to demonstrate or show something relevant to the issue at hand. Most witnesses are eager to tell you their story. A brief explanation of what you want to them to show you and why will go a long way toward getting the cooperation of the witness. If you do not ask, you will not get it.